


All the best makeup looks start from being able to accurately answer this question. We're all made slightly differently which explains why what works for me may not work for you. The answer to this question is not as clear cut as just 'oily skin' or 'dry skin' for everyone. For example, I have the oiliest skin imaginable, but I still get dry patches occasionally in winter on my cheekbones, in fact that was what I wrote one of my first ever blog posts about! In this way I know to apply oil free products to my face in general, but that if I am going to apply a regular moisturiser to only apply it to my cheekbones where I never get blemishes.
If like me, you have enlarged pores, your skin gets shiny, your skin feels greasy often mid way through the day and you're prone to blackheads and spots then your skin is on the oily spectrum and you should tailor your skin care products and makeup appropriately. It's always best to use gel or foam cleansers to wash your face over cream cleansers which can be too moisturising. Also, I cannot stress enough the importance of using a moisturiser afterwards but it must be one tailored to oily skin. If you deprive your skin of moisturiser just for the sweet feeling of dry skin that I so adore after I wash my face, then your skin goes into overdrive to produce oils in the night and you'll wake up with brand new blemishes and pools of oil on your face.. yum!
If your face often feels tight after cleansing rather than relieved at the sensation of being rid of all that oil and you can get red patches and flaking then your skin is on the dry spectrum. It is extremely important that you use products that are deep and rich in moisture that includes your facial cleanser, moisturiser and foundation. Neglecting to do this will create difficulty with makeup application as the dry patches can be further highlighted with makeup application since they can settle in cracks or the edges of patches in the skin.The best cleansers to use are cream or lotion based rather than foaming washes and good ingredients to look out for in products are Evening Primrose oil or just Rose oil.
If your T-zone is often clogged and greasy but your cheeks, around your eyes and neck can crack, feel flaky and look like fine lines are forming. In this case, it is best to use the same type of gentle lotion as your would for dry skin with very moisturising properties all over the face, but use much less of the accompanying moisturiser on your t-zone, lavender is an especially good ingredient to look out for to balance the skins oil production activity. The dry areas should be exfoliated about twice a week with a gentle facial scrub made up of fine exfoliants. Steer clear of Lush's Ocean Salt for example, which I adore but it is made up of large chunks of salt and would cause trauma to dry skin.
Getting your skincare regime right is often something that you won't be able to nail the first time around. I've had a proper skincare routine for about seven years now and I still haven't found 'the perfect' products, but I'm constantly changing and hoping that something will help my problematic skin to heal!
Oh my Oyster!
Tuesday, 30 July 2013
Today, we went on a trip to a cute little seaside town called Whitstable.
I made the mistake of doing my age old trick of wearing leggings under jeans to keep me extra toasty when it actually turned out to be really really warm.
Nonetheless, we took several food breaks and had a lovely time.
It was tremendously busy as Prince Charles and Camilla were making some sort of majestic appearance, not that I was particularly interested with that.
You might squirm a little if you've not tasted these foods before, but they really are good
First we had Oysters, they came on ice and were served with lemon

Then I had a tub of cockles which are my absolute favorite - I know *squirm and gag* to the non shellfish easters
 We then did have a proper dinner, in this cute little place that I was desperate to eat at, but it actually didn't turn out to be that great food, I hadn't been there since I was 11 years old so I was keen to re live the nostalgia, but unfortunately, it dissappointed me, such is life.
Nonetheless, we went on to another place to eat cake, and my goodness it was good cake.
 Afterwards, we looked around the gallery downstairs, but I didn't really love anything there like I do at some galleries.


I made the mistake of doing my age old trick of wearing leggings under jeans to keep me extra toasty when it actually turned out to be really really warm.
Nonetheless, we took several food breaks and had a lovely time.
It was tremendously busy as Prince Charles and Camilla were making some sort of majestic appearance, not that I was particularly interested with that.
You might squirm a little if you've not tasted these foods before, but they really are good
First we had Oysters, they came on ice and were served with lemon

Then I had a tub of cockles which are my absolute favorite - I know *squirm and gag* to the non shellfish easters

Nonetheless, we went on to another place to eat cake, and my goodness it was good cake.


I got home feeling rpetty exhausted, and desperate to change into something cooler, but I was feeling very blessed to have such a wonderful sunset outside my window whilst I wound down

New Video: Bad to the Bronze Makeup Tutorial
Monday, 29 July 2013
I've had both good and bad things to say about the beloved Color Tattoos, however Bad to the Bronze or 'On and on Bronze' as it was bizarrely renamed in the UK is one shade that I simply cannot get enough of, Is there anything it doesn't look good with? Please tell me. My belief at this point is no!
This is my current 'every day' makeup look that I drool all over. The creamy texture of the base is delightful. Then I use Stila 'Kitten' over the top which hurt my pocket a little bit as it is essentially just a higher end drug store brand for a little pan about the size of a coin. Nonetheless, I take it all back Stila, as this is an equally essential part of the makeup look, although I have no doubt you can find a wonderful Dupe in the Naked or Naked 2 palette, or probably even in the Undress Me palette by MUA
Cue the highly vain close ups:
 Enjoy!
I will see you next week for a new video, and in the meantime I will be blogging here daily
This is my current 'every day' makeup look that I drool all over. The creamy texture of the base is delightful. Then I use Stila 'Kitten' over the top which hurt my pocket a little bit as it is essentially just a higher end drug store brand for a little pan about the size of a coin. Nonetheless, I take it all back Stila, as this is an equally essential part of the makeup look, although I have no doubt you can find a wonderful Dupe in the Naked or Naked 2 palette, or probably even in the Undress Me palette by MUA
Cue the highly vain close ups:

I will see you next week for a new video, and in the meantime I will be blogging here daily
Bad Face Base Good Face Base
Sunday, 28 July 2013
It is true what they say, and by 'they' I mean the beauty philosophers of ancient Greece... All Makeup Primers/ Bases are not made equal, as I expensively discovered.
My sisters wedding is fast approaching and I've taken my role as Maid Of Honour rather seriously up until this point, and how I look on the day is a rather important factor. Lots of lucky girls can take for granted that they will look lovely but my blotched and pimpled and scarred face makes things... a little more challenging. You can see the full extent of my skin at the start of any makeup video where I often do a quick before and after.

So you can imagine my delight when in Boots I came across the Smashbox Photo Finish Color Correcting Adjust Foundation Primer. It was hard to miss it as it is pea green and stands out in its clear tube. I picked up the sample and thought 'well this looks interesting, I wonder if it will clear up my redness' As I already had a face full of makeup on I decided a blob over my noticeable freckle on my right hand would have to do, I'd see how it covered that up.

Truth be told I didn't notice a difference in the freckles colour, it didn't look camouflaged to me, even with a bit of foundation sample over the top. However, the wonderful texture of this product had captured my heart. It was creamy but absorbed into the skin wonderfully, which is no small task with my un-penetrable oily skin. While I nearly fell over backwards at paying £25 for the full sized, i spotted the mini size for a fairly reasonable £12.50 and I decided it was more than worth a shot if it would do the trick.
After cleansing my skin, I applied a generous amount and I have to say I am very let down. While it created a nice base to put my makeup over, a £4 primer would do the same. I bought if for its colour theory properties to cancel out my redness, but this barely even touched the redness. Nor did I notice my makeup lasting particularly longer.
The final push to invest in this product unfortunately came from watching a YouTube video that was in full support of these primers and made a special mention to the wonderfulness of the green primer. I feel let down and slightly robbed.
It is by no means a bad product and the texture is pleasant between my fingers without being greasy but this was probably a product made for the 'so-called' acne which consists of the occasional, single red chin spot - not a face full of one breakout.
The Age Old Question : Do I invest in Makeup or in Makeup tools and brushes?
Saturday, 27 July 2013
This is a wonderful mooting point to ponder over but nonetheless a concern for the self indulged and aware makeup addict. It's difficult to choose between good quality makeup products or good quality tools to apply that makeup, which is a very real issue as neither are sold in Poundland so finding a compromise can be tricky.
Nonetheless I will do my best to explain my stance on this as best as I can, and as much as I hate to admit it, my answer is not able to be a direct 'Always invest in good quality makeup over brushes' or 'Always invest in good brushes over good makeup' but I'll do my best to not give a wishy washy politicians answer.
So, I'm going to use an analogy now, and the best I can think of is soup. There is method to this I promise. Imagine you are planning to cook a tomato soup. and you have a set budget to make a batch. The money is not enough to allow you to buy the tip top rainbow dazzle organic juicy tomato's and the super duper whizzy stainless steel blender, so some strategy may have to be used, after some thought, the following options you have are:
1. Use the finest tomatoes known to man, but have no money left for a blender, so you resort to having to use a potato masher to make your soup - the result being lumpy, weird thing in a bowl that isn't really soup at all.
2. Use mid range tomatoes, and a budget blender, the motor burns out on the blender, but the soup is just fine, nothing to write home about.
3. Use the super duper whizzy stainless steel blender and tomatoes from the reduced section which have a green fuzz forming over them and an unidentifiable oozing - the result being moldy soup
I think that was rather a long winded way of getting out what I wanted to say. But ultimately it's illustrating that you'd be better off buying less makeup, and less brushes and only middle price/quality versions of both, rather than a spectacular set of brushes with crummy makeup, or splashing out on Lancome eyeshadow quads and then having to use your fingers to apply a smokey eye.
To me, there just is no one without the other, there is no investing in one and neglecting the other. If you need makeup, you need tools to apply it too.
So if someone were to say to me 'should I invest in Makeup or in brushes?' I would say, if you can only have one, save your money and invest in neither!
The best part of this whole thing, is that, we really don't need to choose anymore. We have such a lot of low-mid range choice in both products and brushes.
For super bargain makeup tools I'd recommend looking for shops on Ebay and Amazon, (check the feedback and reviews first)
or Models Own
or Eco Tools
or E.L.F
For super bargain makeup I'd recommend
MUA (The undress me palette and highlighting powder are particularly good
Sleek (Highly pigmented eyeshadows and blushers
Revlon (Top quality foundations and lip products)
Makeup shoppers on a budget (and lets face it, who isn't?) might find it useful to hop back to yesterdays post where I divulge the four, yes, just four essential brushes in every kit. I think most 'normal' makeup users can be pretty much satisfied with just those four, which makes compromising between cosmetics or tools that much easier.
Makeup brushes: The essentials
Friday, 26 July 2013
If you're looking to start out with some makeup brushes it can be a bit confusing, there are so many different shapes and sizes and brands and colours and hairs and fibres!
Here I'm going to share with you what I would consider to be the 'essentials' this is for the face and the eyes because it is true that your fingers, sponges, and sponge tip applicators that you get with some makeup is sufficient. Investing in some brushes is the next slightly more serious step in your makeup collection.
First of all, I will always recommend synthetic (man made) hairs over natural (animals such as ponys and goats) haired brushes, they are more durable, often cheaper and to be honest, kinder. My initial brush set came from BareMinerals which uses only natural hairs, the brushes are good but knowing what I know now, if given the choice I would purchase all synthetic
The brush breakdown:
1. A foundation brush. If you're a liquid user then a flat foundation brush will work a treat. Mine is from Boots No7 range and I used a money off voucher aswell. If you're more of a powder foundation girl then a kabuki brush is the way foward


2. An 'other' powder brush. It will often be called a face brush, or a bronzer brush. Its just flat and fluffy and is a universal tool to apply bronzer, blusher, highlighter and finishing powder.

3. A flat eye brush, this one is fluffy and broad enough to cover the whole eyelid in a shadow easily, but used on it's tip it can get into the crease aswell. It's a universal brush and you will always have a need for it. This is called the 'Contour shadow' brush by Bare Escentuals

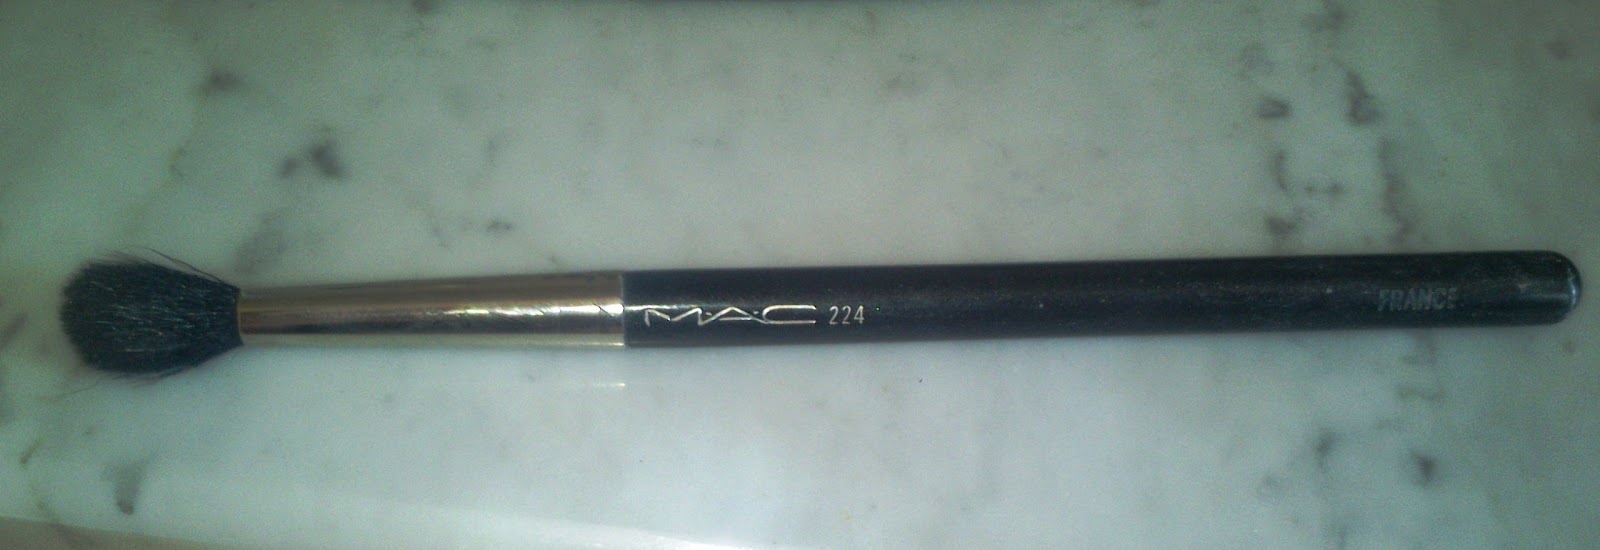
4. Finally, the best til last and my favourite brush of all time, my 'desert island' brush is the MAC 224, although there are plenty of cheaper alternatives. This is the mother of blending brushes. It turns a smokey eye that looks like a black eye into a Beyonce makeup look. Where it's bristles swirl, the world is a better place. I use this brush every single day, and I've not found another I like more. It blends a lot, it blends a little, it tones down colours, brightens eyes, softens edges. Gah! I don't know what it's made of, but it must be filled with fairy dust.

The brushes really do the work for me, I don't consider myself to be especially talented over anyone without brushes at makeup, the brushes to me are kind of like cheating because they are so good, it is very hard to go wrong. They erase all mistakes and blend all flaws and I just swirl the handle in a logical way hoping for the best.
Here I'm going to share with you what I would consider to be the 'essentials' this is for the face and the eyes because it is true that your fingers, sponges, and sponge tip applicators that you get with some makeup is sufficient. Investing in some brushes is the next slightly more serious step in your makeup collection.
First of all, I will always recommend synthetic (man made) hairs over natural (animals such as ponys and goats) haired brushes, they are more durable, often cheaper and to be honest, kinder. My initial brush set came from BareMinerals which uses only natural hairs, the brushes are good but knowing what I know now, if given the choice I would purchase all synthetic
The brush breakdown:
1. A foundation brush. If you're a liquid user then a flat foundation brush will work a treat. Mine is from Boots No7 range and I used a money off voucher aswell. If you're more of a powder foundation girl then a kabuki brush is the way foward


2. An 'other' powder brush. It will often be called a face brush, or a bronzer brush. Its just flat and fluffy and is a universal tool to apply bronzer, blusher, highlighter and finishing powder.

3. A flat eye brush, this one is fluffy and broad enough to cover the whole eyelid in a shadow easily, but used on it's tip it can get into the crease aswell. It's a universal brush and you will always have a need for it. This is called the 'Contour shadow' brush by Bare Escentuals

4. Finally, the best til last and my favourite brush of all time, my 'desert island' brush is the MAC 224, although there are plenty of cheaper alternatives. This is the mother of blending brushes. It turns a smokey eye that looks like a black eye into a Beyonce makeup look. Where it's bristles swirl, the world is a better place. I use this brush every single day, and I've not found another I like more. It blends a lot, it blends a little, it tones down colours, brightens eyes, softens edges. Gah! I don't know what it's made of, but it must be filled with fairy dust.
The brushes really do the work for me, I don't consider myself to be especially talented over anyone without brushes at makeup, the brushes to me are kind of like cheating because they are so good, it is very hard to go wrong. They erase all mistakes and blend all flaws and I just swirl the handle in a logical way hoping for the best.
The easiest Teddy Bear chocolate cake recipe
Thursday, 25 July 2013
I am no cake baker and I certainly don't pretend to be any good in the kitchen but I do know for one thing, that this chocolate cake tastes really good and there is just no way to mess up a recipe with two steps.
They are as follows:
1. Mix 200g of self raising flour, 50g of cocoa powder, 125g of butter, 250g of caster sugar, 2 eggs and 160ml of water together until the mixture has changed from a darker to a lighter shade of brown (add some vanilla essence if you're feeling 'adventurous')
2. Pour into a pre greased cake pan and place in a Moderate temperature oven
Conversion: Moderate = 180 degrees celcius = 350-375 Fahrenheit = Gas mark 4-5
It takes about 30 minutes to cook, but keep checking on it to ensure it doesn't burn, the mixture is quite 'wet' so I find that one moment it looks of a mousse texture, and the next it's got a burnt top
I made an unsuccessful teddy bear shape the first time around due to not greasing the pan (from Morrisons, £4) well enough, so I was not taking any chances this time.

 If I can give you one magic tip it would be to wait until your cake is stone cold before icing. Stone cold doesn't mean a bit warm, or just warm on the bottom, it means cold as though it has been left alone so that every single crumb can cool. It's the most painful part of baking I find, but then I remind myself that there is no point taking all that effort and love to make something, to ruin it at the last hurdle. Happy baking! Happy Bear!

They are as follows:
1. Mix 200g of self raising flour, 50g of cocoa powder, 125g of butter, 250g of caster sugar, 2 eggs and 160ml of water together until the mixture has changed from a darker to a lighter shade of brown (add some vanilla essence if you're feeling 'adventurous')
2. Pour into a pre greased cake pan and place in a Moderate temperature oven
Conversion: Moderate = 180 degrees celcius = 350-375 Fahrenheit = Gas mark 4-5
It takes about 30 minutes to cook, but keep checking on it to ensure it doesn't burn, the mixture is quite 'wet' so I find that one moment it looks of a mousse texture, and the next it's got a burnt top
I made an unsuccessful teddy bear shape the first time around due to not greasing the pan (from Morrisons, £4) well enough, so I was not taking any chances this time.


Yo Sushi Yo Shopping
Wednesday, 24 July 2013
I haven't eaten at Yo Sushi for over a year, but my mama and I decided to eat there again for a fun conveyor belt lunch!
I ate my favourite first of all which was the green beans in salt, you have to suck and pop the pods, eat the beans inside and discard the pod, they're like delicious savoury snacks, better than crisps!
I had a sweet and sour chicken-y thing, some other California rolls, one was rolled in chilli powder so I gave that to my mama that was a little too spicy for me. I also had a bottomless cup of miso soup which I love love love!
I had three refills!


Then for the first time we were tempted by the conveyor belt desserts! We shared a plate of rice balls with a chocolate filling and they were to our surprise not a fondant texture at all, but a real gooey, squishy texture which felt really nice to pinch! They were not too sweet and had a very distinct rice flavor, but were delicious.
 Then we shared some custard filled pancakes with a strawberry sauce that tasted like crushed strawberries. They were even more delicious, but by this point I was feeling rather sick as we had acquired a huge pile of plates!

Then we did a little shopping and this was by far my favorite front page of the newspapers to announce the arrival of the royal baby
 I was treated courtesy of my mother to a 'summer onesie' which are the comfiest summer pjs ever! it was the last one left in the Next sale

I then got this adorable rose jumper from the Zara sale which was £7.99!
 And finally, a mini version of the green toned Smashbox face primer. the sample felt amazing on my skin, and I'm looking for a primer to cancel out the redness of my horrible blemishes, I'm yet to see how good it is! The full priced bottle is £25, which took my breath away a little, so I treated myself to the cuter size for £12

I ate my favourite first of all which was the green beans in salt, you have to suck and pop the pods, eat the beans inside and discard the pod, they're like delicious savoury snacks, better than crisps!
I had a sweet and sour chicken-y thing, some other California rolls, one was rolled in chilli powder so I gave that to my mama that was a little too spicy for me. I also had a bottomless cup of miso soup which I love love love!
I had three refills!


Then for the first time we were tempted by the conveyor belt desserts! We shared a plate of rice balls with a chocolate filling and they were to our surprise not a fondant texture at all, but a real gooey, squishy texture which felt really nice to pinch! They were not too sweet and had a very distinct rice flavor, but were delicious.


Then we did a little shopping and this was by far my favorite front page of the newspapers to announce the arrival of the royal baby


I then got this adorable rose jumper from the Zara sale which was £7.99!


Sitting on Stage - Derren Brown Infamous Tour
Tuesday, 23 July 2013
The stage is very minimal with just a rickety wooden chair on it, I was very excited to be seeing Derren Brown in the flesh. They were extremely strict on the concept of absolutely no photographs mid performance or in the interval under threat of being removed from the beautiful Palace theater London. I took this one at the very start, before the performance had begun so it's all I have to remember it by!

Derren was a really fantastic performer and truly live entertainment with just amazement after amazement! And it's crazy how all the little amazing things that he does interlink into one big amazing finale, it's just outright bizarre! There's a lot of audience participation and in the interval there was a chance to get on stage for the second half of the show on a first come first served basis so I got to sit up on the stage and it was suuuuuuuper hot under all those lights. But a once in a lifetime thing to see Derren perform that closely.

On the way home to cool down I delighted in having a Percy Pig ice lolly which was super delicious!
New Video: Summer Pink POP! Makeup Tutorial
Monday, 22 July 2013
Todays video is just perfect for Summer when you want to wear natural, mostly light products but a bit bright lip POW to jazz it all up a little and makek it look like you have made a real effort when actually it's taken you all of five minutes


I'm wearing eyeshadow colours all from the Urban Decay Vice palette but all you really need is a matte skin tone colour, a lighter gold and a darker gold colour!
For the lips you can wear any bright colour you want, I show a few swatches in the video, the Maybelline Colour stay in shade Pink or Peach Cocktail, I can't remember it's name and I don't think it says on it, a generic pink from a big makeup kit I got given ages ago, and a Revlon Lip butter because well we all love them!
Be brave and add a little pop to your makeup this summer!


I'm wearing eyeshadow colours all from the Urban Decay Vice palette but all you really need is a matte skin tone colour, a lighter gold and a darker gold colour!
For the lips you can wear any bright colour you want, I show a few swatches in the video, the Maybelline Colour stay in shade Pink or Peach Cocktail, I can't remember it's name and I don't think it says on it, a generic pink from a big makeup kit I got given ages ago, and a Revlon Lip butter because well we all love them!
Sun Sand Sea and a happy aftermath
Sunday, 21 July 2013
Here is the bridal party enjoying our last few sunny moments of the hen party 'the morning after the night before'
Everyone seemed to have a raelly good time, and it was terrific fun to dress up as a Barbie for one night!

My sister gave me her gorgeous Barbie necklace which I have not taken off since and plan to film a video wearing very soon as I love it so much! I am in the middle and my beautiful sister is on the far right! The lovely bridesmaid on the far left drove us home while we all chatted and dozed.
I am happy to be back in my room but I also can't believe that the hen party has been and gone, I feel like I've been planning it every day for about 3 or 4 months! I suppose that's how it will feel when the wedding is over, 2 years of planning and then suddenly, we'll just be talking about how it was and looking back on beauitful photos.
What a perfect way to end the week!
Everyone seemed to have a raelly good time, and it was terrific fun to dress up as a Barbie for one night!
My sister gave me her gorgeous Barbie necklace which I have not taken off since and plan to film a video wearing very soon as I love it so much! I am in the middle and my beautiful sister is on the far right! The lovely bridesmaid on the far left drove us home while we all chatted and dozed.
I am happy to be back in my room but I also can't believe that the hen party has been and gone, I feel like I've been planning it every day for about 3 or 4 months! I suppose that's how it will feel when the wedding is over, 2 years of planning and then suddenly, we'll just be talking about how it was and looking back on beauitful photos.
What a perfect way to end the week!
Barbie Hen Party - Makeup & Outfit
Saturday, 20 July 2013
Congratulations to my beautiful sister on her roaring success of a hen party!
I'd organised a cocktail making class and Georgie has insisted that she wanted a Barbie themed everything else so I tried my best to make that clear!
A lot of girls showed up in pink and looked fabulous, we ate Italian food before going on to the class, and then a few clubs before walking back along Brighton coast to fall into our hotel bed!
My sister was so hyperactive from all the cocktails that we ended up ordering food at about 3am but I really wasn't all that hungry by that point!
 My sister and I are both wearing dresses from Lipsy that we bought on Ebay, and they are both already relisted on ebay to sell on to some other lucky buyer. My sister was in head to toe glitter and looked like a real Barbie, she had her hair blow dried professionally and curled too!
My dress was a black bustier with a pink ruffle skirt, I loved it very much but it was a size too big for me!
We're both wearing Barbie Hen Party sashes with 'The Bride' on the back of my sisters and 'Maid of Honour' on the back of mine!
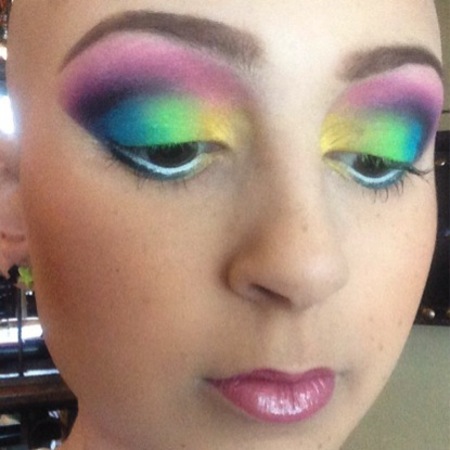
 This is the best photograph that I have of my makeup, I'm wearing a hot pink in the crease and a cobalt blue on the lid, I also cut a pair of false lashes in half and stuck them to the outer corner of my lashes to create a real 'doll' effect.

Here's a shot of the whole hen party, we looked such a fun sight all together, but we were all feeling rather worse for wear by the end. The red shots that you can see on the bar are 'chilli' shots and were absolutely disgusting I must say! Mine made me feel quite ill that I had to sit out of the rest of the class and just sip water which was a bit of a shame as tehre were so many yummy cocktails to try. But after a few hours I had perked up a fair bit!
I'd organised a cocktail making class and Georgie has insisted that she wanted a Barbie themed everything else so I tried my best to make that clear!
A lot of girls showed up in pink and looked fabulous, we ate Italian food before going on to the class, and then a few clubs before walking back along Brighton coast to fall into our hotel bed!
My sister was so hyperactive from all the cocktails that we ended up ordering food at about 3am but I really wasn't all that hungry by that point!

My dress was a black bustier with a pink ruffle skirt, I loved it very much but it was a size too big for me!
We're both wearing Barbie Hen Party sashes with 'The Bride' on the back of my sisters and 'Maid of Honour' on the back of mine!


Here's a shot of the whole hen party, we looked such a fun sight all together, but we were all feeling rather worse for wear by the end. The red shots that you can see on the bar are 'chilli' shots and were absolutely disgusting I must say! Mine made me feel quite ill that I had to sit out of the rest of the class and just sip water which was a bit of a shame as tehre were so many yummy cocktails to try. But after a few hours I had perked up a fair bit!
The END OF THE WORLD
Friday, 19 July 2013
Alright so it amy not have been the end of the world exactly, but I did ride 'Swarm' which is the most 'end of the world' ride that I have ever been on!
It has overturned ambulances, you fly through smashed billboards and genuinely believe that you will lose a limb or your head on the way through, it is just crazy!
You could also go on the ride backwards but the queue would have been even longer so we rode it fowards!
It's difficult/ impossible to take actual photographs on rides, but I was able to on the more mellow water rides which were a welcome relief in the 30 degrees celcius heat!
Here's a little picture-o-gram:
This was on loggers leap, which is the little log flume, totally cute and you get a little drenched but absolutely nothing compared to Tidal Wave where I thought we had derailed from the ride and that death was imminent because all I could see was water and more water
 Here's a little clip on the Rumba rapids which I always loved because the theme is Ribena! It's super cute, and you're in a giant circle rubber dingy thing, and it's just all kind of scenic and relaxing and you go around a river, and it's the perfect way to settle your stomach after going on Collosus followed by Stealth (google it)
 And finally, as we were leaving the car park, exhausted, aching and sweaty, I was met with this wonderful sight, only The Walking Dead fans will be able to truly appreciate the humour of this, and I thought what a considerate walker they were too, to let us all know with a luminous jacket!

Now I'm feeling quite content that I've caught up with all the new rides at Thorpe park I just want to hop into the shower and wash away the tidal wave water!
It has overturned ambulances, you fly through smashed billboards and genuinely believe that you will lose a limb or your head on the way through, it is just crazy!
You could also go on the ride backwards but the queue would have been even longer so we rode it fowards!
It's difficult/ impossible to take actual photographs on rides, but I was able to on the more mellow water rides which were a welcome relief in the 30 degrees celcius heat!
Here's a little picture-o-gram:
This was on loggers leap, which is the little log flume, totally cute and you get a little drenched but absolutely nothing compared to Tidal Wave where I thought we had derailed from the ride and that death was imminent because all I could see was water and more water


Now I'm feeling quite content that I've caught up with all the new rides at Thorpe park I just want to hop into the shower and wash away the tidal wave water!
Raw Vegan Chocolate Pudding Delight
Thursday, 18 July 2013
Today I had three avocados going ripe and no clue what to do with them, until I suddenly remembered that I've been dying to try out an Avocado dessert because it sounds so strange!
So here's my little spin on it and it turned out a treat, I don't even like avocados but I simply could not get enough of this!
You will need a blender or food processor
An avocado, peeled and chopped
30 grams cocoa powder
85 grams of honey
60ml Almond milk
Presentation isn't my strongest point, I'm all new to this food photography malarky!

Blend blend blend until it's all smooth and delicious and creamy and there's no avocado lumps, and serve to unsuspecting individuals and ask them to guess what makes that wonderful creamy base!
Summertime Sadness OOTD
Wednesday, 17 July 2013
Yes I am still without a shadow of a doubt still obsessed with Lana Del Rey's 'Born to Die' Album, with my favorite song still being Summertime Sadness. Since my summer holiday away has already been and gone, and I'm away from my friends and university I'm feeling in a bit of a limbo place and definitely getting waves of 'Summertime Sadness' which is tragic really, since I love being at home and near my home friends, my mum and my sister and having lots of extra time to write on here and think of and create more videos too.
In the mean time, let me share with you a little snapshot of my day. I'm wearing a dark brown colour in the crease and a pale lid colour, thick black winged eyeliner and a pale lip. I'm wearing white eyeliner on my lower waterline, which I like to do in the summertime!
I applied highlighter to my face, MACs Soft and Gentle, to give me a kind of dewy (or sweaty?) hue to the skin.
My hair is just natural and swept to the side.
 I'm wearing candy striped shorts from New Look last year that my lovely sister bought as a present for me. My top is from H&M, and is just a white mid sleeve top, tucked into my shorts!
I have a polka dot bag from Primark about a year ago which I forgot I even owned.
Polda dots and stripes may not be everyones cup of tea but I didn't have much choice bag-wise!

Wave hello to the creepy body peeking in the background!
Just kidding it's the mannequin I use to sell my old clothes on ebay!
In the mean time, let me share with you a little snapshot of my day. I'm wearing a dark brown colour in the crease and a pale lid colour, thick black winged eyeliner and a pale lip. I'm wearing white eyeliner on my lower waterline, which I like to do in the summertime!
I applied highlighter to my face, MACs Soft and Gentle, to give me a kind of dewy (or sweaty?) hue to the skin.
My hair is just natural and swept to the side.

I have a polka dot bag from Primark about a year ago which I forgot I even owned.
Polda dots and stripes may not be everyones cup of tea but I didn't have much choice bag-wise!

Wave hello to the creepy body peeking in the background!
Just kidding it's the mannequin I use to sell my old clothes on ebay!
Talias Tuesday
Tuesday, 16 July 2013
I feel genuinely saddened to be writing this post today but it simply felt wrong to be writing about makeup, glitter, holidays or clothes, so I've decided not to shy away from the importance of today.
Today the inspiring Talia Joy Castellano of YouTube of
The Ellen Show of CoverGirl Cosmetics and of spreading a lot of love and
joy (true to her name) died one month shy of her fourteenth year on earth.
Besides being outright adorable, she was extremely talented at makeup application and presenting herself to the world. She was a genuinely good influence and such a huge ball of positivity despite dealing with neuroblastoma and preleukemia in her short but significant years here.
Life has a lot of bad heartache and sadness that touches everyone but Talia was not held back by what life threw at her and told us all about how to 'just keep swimming' when the going gets tough.
I hope that her spirit is now freed, and that there is no more pain- only dancing around being even more joyful than before.
Join me in thinking of her family at this time and sending them lots of prayers to ease the pain and grief in their sore hearts and trying to uplift their spirits in rejoicing in Talia's wonderful, beautiful life.
New video: Tropical Merrmaid Makeup Tutorial
Monday, 15 July 2013
Fresh from the tropical sea... I present to you my newest makeup tutorial. It's tropical, summery and reminds me of mermaids!
I used the W7 palette for the first time in ages, and to tell you truth I had forgotten why I'd hidden that palette away for quite some time. The colours are very talcy and crumbly, there's a hell of a lot of fall out on the cheeks, not good unless you like blue blusher. But on the other hand the colours do blend very easy as they're not particularly stable even with pigment. Nonetheless the result is still mighty pretty.

Makeup FAQ Primers, Eyebrows and lips and more!
Sunday, 14 July 2013
I don't know if what I am about to say would make a very exciting video, but hopefully we can make it a fun and interesting blog post, here are the most Frequently Asked Questions about makeup that I get messaged to me, or in the comments of videos, or that I just see all over the interwebs. We are about to go into the nitty gritty of eyebrows, contouring, skin care and top tips!
1. What is the difference between an eyeshadow base or an eyeshadow primer?
This is the old classic question. An eyeshadow base is usually coloured, you can get skin coloured bases, blues, greens, purples, golds - in fact any colour! They can come in a pot to apply with a brush ro your figner or in a chunky eye pencil. The ultimate goal of them is to create a great base for the rest of your eyeshadows, to make the colours truer and to last longer. A Primer is usually of a lotion consistency and dried to a clear finish, sometimes they might have a little shimmer to them or a little something else but they are designed to be a universal underlayer for any colour makeup look. You do not need to put a primer under an eyeshadow base.

2.Does Priming my face make a difference/ what is it?
Priming your face does make a difference, and it's not until you prime that you will notice. Priming your face before you apply your foundation creates a much smoother canvas to work with, it covers over pores, blemishes and fine lines to give an airbrushed finish once you've applied your foundation, and it makes it last longer! You shouldn't use eye primer as a face primer and vice versa!

3.How do I contour my face without looking silly!?
Don't load up your brush with bronzer, just put a tiny bit on the brush, suck in your cheeks if you need to so that you can see clearly under the cheekbones and begin just by contouring under there gradually building up product and blending it out. If you want to go more advanced you can contour the whole face. You can watch my video on that here

4.How do I fill in my eyebrows?
I always think it's easier to use a brow pencil than powder, although now I think I prefer using powder. Anyway, remember to keep in mind a very light hand, so that when you're initially drawing, it's almost like you're gently sketching the individual hairs on a horses main. Do little, gentle strokes with the pencil to get the feel of it and use your natural brow as a guide and follow it, just fill in where the hairs are a bit more sparse.Even if you have perfect natural brows, I think everyone benefits from a little brow filling
5.What is the point in a lip liner?
A lip liner works as a great base for lipsticks on top as it helps them to stay on longer. You can also get a lot more precision when outlining the lips with a pencil than a chunky lipstick. Remember lip liners should not just line the lips but colour in the entire lips with it too! I often just wear lip liner by itself.

6.Am I really supposed to wear sun cream on my face every single day?
If you want to help your skin to look as youthful as possible then yes. But it's not got to be like slathering oily thick factor 50 on your face. Lots of foundations, primers and daily moisturisers contain SPF so that you won't even realise that you are wearing sun protection. So look out for them.

7. I have oily skin what is the best makeup for me?
Oil free makeup! Revlon Colorstay foundation has a special formulation for oily skin which I love. Laura Mercier create oil free tinted moisturisers for a lighter coverage but a bit heavier on your bank balance. BareMinerals is good too if you can't even stand the feeling of a liquid foundation. If you are going to use cream blushers, highlighters, bronzers etc you must either use a powder version of that product (similar shade) over the top, or a transluscent finishing powder to lock the products in place and stop them sliding on your skin.

8. I have dry skin what is the best makeup for me?
A good primer will help to ensure that your makeup doesn't look flaky. Laura Mercier Silk cream foundation works well with dry skin and is a full coverage. MAC Face and body foundation has moisturising emollients and is a much lighter coverage or the L'Oreal Paris Lumi Magique Foundatio. Also, cream blushers and bronzers.
9. I'm scared to wear bold lips, where do I start?
Start with a lip tint, I like the Lip and Cheek stain from the Body Shop in Rose Pink, onr Benetint from Benefit or Revlon Lip Butters. They have a bright colour but are easy to apply, don't require lots of touch ups and still look somewhat natural

10.What is your number 1 makeup tip/advice?
Take your makeup off every single night, and not just with a face wipe. I have very problematic skin and taking my makeup off is one of my favorite parts of the day. I love cleansing my face thoroughly and it is absolutely key because if your skin isn't in good, healthy shape then applying flawless makeup becomes much harder work!
If you enjoyed this post, I'll do a part 2 because there are so many more questions that are common misconceptions or just not understood or explained very well!
Take Care and enjoy!
1. What is the difference between an eyeshadow base or an eyeshadow primer?
This is the old classic question. An eyeshadow base is usually coloured, you can get skin coloured bases, blues, greens, purples, golds - in fact any colour! They can come in a pot to apply with a brush ro your figner or in a chunky eye pencil. The ultimate goal of them is to create a great base for the rest of your eyeshadows, to make the colours truer and to last longer. A Primer is usually of a lotion consistency and dried to a clear finish, sometimes they might have a little shimmer to them or a little something else but they are designed to be a universal underlayer for any colour makeup look. You do not need to put a primer under an eyeshadow base.

2.Does Priming my face make a difference/ what is it?
Priming your face does make a difference, and it's not until you prime that you will notice. Priming your face before you apply your foundation creates a much smoother canvas to work with, it covers over pores, blemishes and fine lines to give an airbrushed finish once you've applied your foundation, and it makes it last longer! You shouldn't use eye primer as a face primer and vice versa!

3.How do I contour my face without looking silly!?
Don't load up your brush with bronzer, just put a tiny bit on the brush, suck in your cheeks if you need to so that you can see clearly under the cheekbones and begin just by contouring under there gradually building up product and blending it out. If you want to go more advanced you can contour the whole face. You can watch my video on that here

4.How do I fill in my eyebrows?
I always think it's easier to use a brow pencil than powder, although now I think I prefer using powder. Anyway, remember to keep in mind a very light hand, so that when you're initially drawing, it's almost like you're gently sketching the individual hairs on a horses main. Do little, gentle strokes with the pencil to get the feel of it and use your natural brow as a guide and follow it, just fill in where the hairs are a bit more sparse.Even if you have perfect natural brows, I think everyone benefits from a little brow filling

5.What is the point in a lip liner?
A lip liner works as a great base for lipsticks on top as it helps them to stay on longer. You can also get a lot more precision when outlining the lips with a pencil than a chunky lipstick. Remember lip liners should not just line the lips but colour in the entire lips with it too! I often just wear lip liner by itself.

6.Am I really supposed to wear sun cream on my face every single day?
If you want to help your skin to look as youthful as possible then yes. But it's not got to be like slathering oily thick factor 50 on your face. Lots of foundations, primers and daily moisturisers contain SPF so that you won't even realise that you are wearing sun protection. So look out for them.

7. I have oily skin what is the best makeup for me?
Oil free makeup! Revlon Colorstay foundation has a special formulation for oily skin which I love. Laura Mercier create oil free tinted moisturisers for a lighter coverage but a bit heavier on your bank balance. BareMinerals is good too if you can't even stand the feeling of a liquid foundation. If you are going to use cream blushers, highlighters, bronzers etc you must either use a powder version of that product (similar shade) over the top, or a transluscent finishing powder to lock the products in place and stop them sliding on your skin.

8. I have dry skin what is the best makeup for me?
A good primer will help to ensure that your makeup doesn't look flaky. Laura Mercier Silk cream foundation works well with dry skin and is a full coverage. MAC Face and body foundation has moisturising emollients and is a much lighter coverage or the L'Oreal Paris Lumi Magique Foundatio. Also, cream blushers and bronzers.
9. I'm scared to wear bold lips, where do I start?
Start with a lip tint, I like the Lip and Cheek stain from the Body Shop in Rose Pink, onr Benetint from Benefit or Revlon Lip Butters. They have a bright colour but are easy to apply, don't require lots of touch ups and still look somewhat natural

10.What is your number 1 makeup tip/advice?
Take your makeup off every single night, and not just with a face wipe. I have very problematic skin and taking my makeup off is one of my favorite parts of the day. I love cleansing my face thoroughly and it is absolutely key because if your skin isn't in good, healthy shape then applying flawless makeup becomes much harder work!
If you enjoyed this post, I'll do a part 2 because there are so many more questions that are common misconceptions or just not understood or explained very well!
Take Care and enjoy!
Subscribe to:
Posts (Atom)